Papered ceilings in old houses – friend or foe?
Papered ceilings in old houses are incredibly common, as in times gone by they were used for a variety of practical and decorative reasons.
The trouble when tackling a modern renovation project is that disturbing a potentially decades-old ceiling may lead to more problems than it is worth.
This guide will give you a full overview of papered ceilings in old houses, along with tips for maintenance and restoration.
What are the benefits of papered ceilings in old houses?

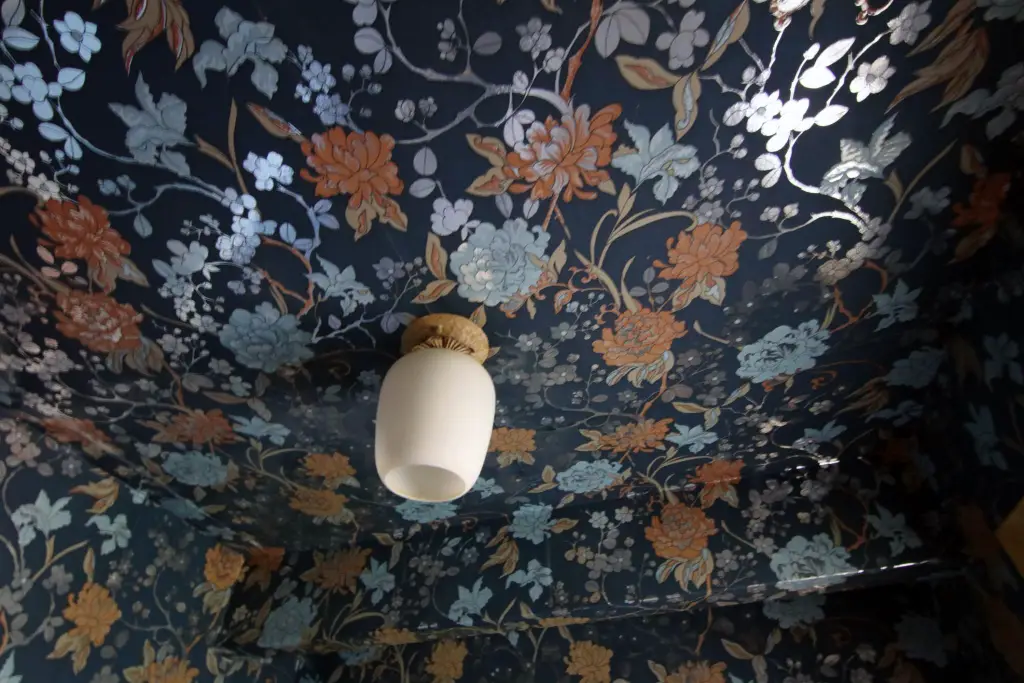
- Decorative appeal: A papered ceiling can add character and charm to a room, as well as complement the overall design style of the home. Adding vibrant colours and patterns can be made easier when using wallpaper.
- Conceals imperfections: Old plastered surfaces are notorious for coming away leaving bubbles and contours. Wallpaper can help to hide any cracks, dents, or unevenness in the ceiling surface, which can be especially beneficial in older homes.
- Insulation: The wallpaper can help to insulate a room and keep it warmer during the winter.
- Easy to maintain: Papered ceilings are easier to clean and maintain than painted ones, as they can be wiped down or dusted with a soft cloth.
- Durability: Wallpapers have a longer lifespan than paint and can last for many years, depending on the quality of the paper and the installation process.
- Cost-effective: Wallpapering a ceiling is a cost-effective way to update the look of a room and add value to an older home.
How to maintain papered ceilings?
As with anything in the home, regular maintenance and cleaning is often the best approach.
Maintaining and caring for papered ceilings in old houses is relatively easy with the following steps:
Dusting: Regularly dusting your papered ceiling with a soft cloth or a duster can help to remove cobwebs and dust, which can accumulate over time.
Cleaning: For minor stains or spills, you can wipe down the wallpaper with a damp cloth. Be careful to avoid saturating the paper. Avoid using harsh chemicals or abrasive materials, as these can damage the wallpaper.
Repairs: If your wallpaper becomes damaged, it’s best to repair it as soon as possible to prevent further deterioration. You can patch small holes or tears with wallpaper paste and a piece of matching wallpaper.
Avoid moisture: Keep the room well-ventilated to avoid moisture buildup, which can damage the wallpaper and cause mould or mildew to form.
Avoid direct sunlight: Papered ceilings in old houses should be kept away from direct sunlight as much as possible, as the UV rays can cause fading and discolouration over time.
Keep an eye on the humidity: If your home has high humidity, it could cause the wallpaper to peel or wrinkle. If you see any signs of humidity-related damage, it’s best to address it as soon as possible. Humidity readers are relatively cheap and can be a great way of monitoring your home.
If you are struggling with high humidity, a dehumidifier will help pull some of the excess moisture from the air.
Professional cleaning: If your wallpaper is very dirty or has severe stains, it may be best to hire a professional cleaner to handle the task.
Preservation: If you have a historic home with original wallpaper on the ceiling, it’s always best to consult with a preservation professional to maintain and preserve it.
Papered ceilings and lime plaster issues
In older homes tradesmen typically used a lime plaster mix rather than gypsum which is more commonly used today.
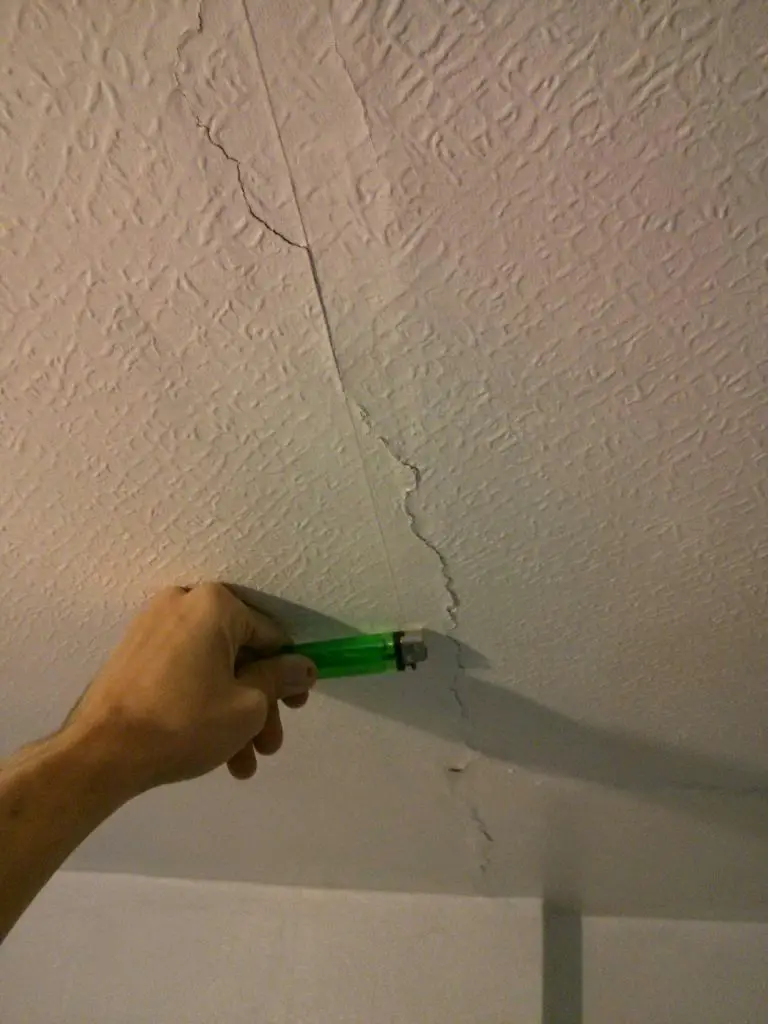
Plaster of any form can deteriorate over the years. If you believe that your ceilings still have the original lime plaster you should take extra care as removing any old paper could result in larger chunks of plaster coming off as well.
You can generally assess the condition of your lime plaster by looking at the following things:
- Cracking and flaking: This can occur due to age, weathering, or movement in the underlying structure. If the plaster looks contoured and feels spongey it has likely detached from the lath and is in need of more intensive repairs.
- Efflorescence: This is a white, powdery substance that forms on the surface of the plaster due to the migration of salt to the surface. This could be a sign of dampness or historical damp, so investigating the area above the ceiling is important.
- Moisture damage: Lime plaster is porous and can absorb moisture, which can lead to cracking, efflorescence, and even mould growth. Look for areas of discolouration or other signs of moisture.
- Deterioration of the lath: The lath (a lattice-like material used as a backing for the plaster) can rot or become damaged, which can cause the plaster to fall off or become unstable. Checking for areas of weakness or instability will help identify the overall condition of your plaster.
What are the renovation options?
When renovating a house with a wallpapered ceiling which has been in place for a number of years you have a few different options.
Let it be: removing the existing wallpaper can result in chunks of damage to the ceiling. If this goes really bad it may require a full re-plaster. If you don’t have the skills to repair it yourself or the budget to repair it, living with your existing wallpaper may be a good option in the short term.
Remove and replace: if your current wallpaper is in poor condition or you just fancy a change of style, removing the old stuff and replacing it with a new style will do wonders to refresh the room. Be careful when removing and if you don’t have a smooth surface on the ceiling opt for textured wallpaper.
Paint Over: the final option would be to leave the current paper on and paint over. It may require a couple of coats but can completely change the feel of a room.
Removing or upgrading old wallpaper on a ceiling
If you really must remove the old paper patience is key. You must also ensure you’ve thoroughly assessed the condition of the plaster before you begin.
Once you start removing it may expose more issues that cannot be wallpapered over.
To remove the old paper you have a few options.
You can use a normal wallpaper steamer though you will have to work in short bursts as the hot water droplets will likely fall down on you, which can make for uncomfortable work.
The second option is the absorption method. Soak sections of your ceiling with either a spray bottle or a sponge. Typically it will require a couple of soaks of the same area before it begins to come away.
As with any wallpaper removal, it will depend on the number of layers of wallpaper you are dealing with and how long it’s been on. If you have several layers, it can be incredibly stubborn to remove.
The issue with stubborn wallpaper is that you risk damaging the plaster beneath. Too much force and you can rip off chunks of the old lime plaster, so a good amount of patience is required.
Painting over an old papered ceiling
If you have the right tone of wallpaper on your current ceiling or have opted for dark paint, you may be able to paint over the existing paper.
When doing this the key is to prepare the area fully and ensure you have a good surface to paint over. The worst case is spending time and money painting over the ceiling and not being pleased with the finish.
Here are the steps for painting over a papered ceiling:
- Prepare the surface: Start by removing any loose or peeling wallpaper and patching any holes or cracks in the ceiling. Allow the patches to dry completely.
- Clean the surface: Use mild detergent and water to clean the ceiling, making sure to remove all dust, cobwebs, and any other debris. Allow the ceiling to dry completely.
- Prime the surface: Apply a coat of paint primer specifically designed for use on wallpaper. This will help to seal the wallpaper and create a smooth surface for the paint to adhere to. Allow the primer to dry completely before painting.
- Paint the ceiling: Use a paint roller or paintbrush to apply paint to the ceiling in thin, even coats. Be sure to work in small sections and blend the paint well to avoid leaving visible roller marks or brush strokes. Allow the paint to dry completely before applying a second coat, if necessary.
- Finishing: Once the paint is dry, you may need to touch up any imperfections, and if necessary, you can use paintable caulk to fill any gaps, cracks or holes.
If you’d like to learn more about decorating old houses view our full series.
Leave a Reply